Wednesday, July 20, 2016

Kittyhawk 1/32 Sabredog FINISHED GALLERY and part 4 combo

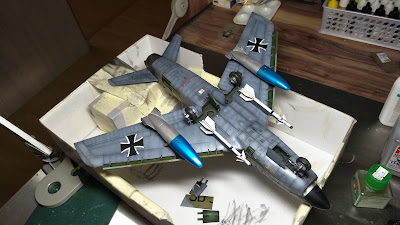
THE FINALE PICTURES AND THE BUILD UP TO IT BELOW

Guys, finally, after a long time struggling and wrestling, its finally nearing the finish line.

My 6th uncle got divorced sometime back. He torn up all of the wedding photos taken some 30 years ago and wanted to throw away his picture frames. I stopped him and took home this antique. Reinforce the back and level it with 1 complete box of Tamiya Epoxy Putty. Cut a piece of 1mm Tamiya PS card, scored in the cracks and panel lines used for cement casting. Then I spray using black, olive drab, light grey and Gunze Surfacer 500 out of the aerosol can to get this cement looking thing. Dabbed in the oil leak stains and washed in the cracks and crannies and its done, all 4 hours of work.

Test fitting it is quite okay, I wanted only to hold the undercarriage and allow the model to over hang everything. Looks like a trophy, But truth be told, I have got no other choices, have I? With that out of the way with the exception of a few kinks from knocks, I reckon, its okay looking to pass off as not an after thought, even though it significantly is.

I armed the dog with the only tanks and AIM9Bs, the missile were badly made and fins break off all over the place. Couldn't find any spares this old in history, only 9Ls and the new X series. But to fork out good money to buy a Trumpy weapons kit is out of the question for me. Make do man. As the kit is not for sale anyway. As you can see, I did not weather the bottom very much as its glued to the base for Airfix show.

I worked on the oils using mainly black, green, white and yellow to do some shading and panel differentiation. Just to spruce up the model a bit, since its such a big piece of work, leaving it plain Jane is quite a shame.

Just to make things a little more interesting. The surface was like this due to airbrushing and Tamiya black wash.

These are my starting pictures before I whacked on the oil paints from Winsor and Newton who has been with me for more than 15 years.

After Sienna, Black, White, Yellow and Sage Green, the wings and fuselage looks like this. Tonal variations that I kind of like.

Some tinkering with the upper surfaces. The mirror was too bright on the photo taken with my trusty Oppo R9 Plus phone. So, I darkened it subsequently.

Overall, the model looks okay to me, for the other people who worked in the aircraft factory, this looks crap, well, crap is, crap does. Its better to look crappy than to be mistaken for a die cast fake right? At least crap cannot be replicated, unlike die cast look alike factory standard model. I wonder why, at this age of artisan sharing freely, still there are people not willing to improve on painting skills and spend money to make die cast look alike fakes! I don't get it.

This is the last bit of work and I am done. I liked to have the vertical surfaces slightly darker than the horizontal ones as the reflected light intensities are different. I am quite please with how this tough build turned out to be.

Wednesday, July 13, 2016

Kittyhawk 1/32 Sabredog Part Three

A week's break went to Laos to shoot some guns and work. Now I am back for some upgrades from where I left off the last time.
Where I left off the last time, I took some sprues, stretched them to form the 5) Caliber machine gun barrels as the kit supplied ones are about 12mm too short! These were inserted from the front in their respective mounting ports. Each side having 2 pieces.

Overall the smoke shading makes the model very high in contrasts and as a starting point, it served a good basis for the weathering to tone down and even out the harshness giving it a little hit of panel disparity, which is what I have in mind, so, on went a lot of diluted Tamiya black paint in enamel thinners.

Care is also taken to try to highlight the rivets as much as I can so that it shows up and it makes the model looked more 3D than plain Jane.

 Here we see that the barrels are added and glued in place and painted later with steel from Vallejo.

One disgusting thing about this cheapo tooling and small machine injection kit is that the pressure is so low even for soft plastics that sink holes and overflowed ejection pin marks are all over the place, even in this odd part that is like 5mmX4mm in size. It is a criminal act to ask so much money for so much crap.

The undercarriage is marked to be painted in silver, which is what I did with Vallejo Chrome.

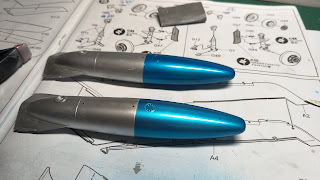
The fuel tanks were given 2 coats of Vallejo Aluminum metal paints and polished later to a shine.

The tanks were then masked and given a few coats of Tamiya Clear Blue to give it the metallic blue finishes with is instructed in the instruction sheets.

I took a 30 year old picture frame that my uncle didn't want anymore. Took out all the screws and nuts int here to form the fixtures like stand and position fasteners. Then I took half a set of Tamiya Epoxy Putty and kneaded them into balls to hold up the sides against being split apart. The frame was then pressed with tool box and books for 6 hours after being placed on a large piece of paper. I then measured and cut a matching cab and used Tamiya Olive Drab, Ghost Grey, Gunze Primer in grey and also the primers in white. Cracks are scribed into the tiles to form more interest. This is then done with some weathering. Since its to depict German Cold War relic, the model looks okay if we weather it too blandly too. This is superglue to the frame after that its been painted and weathered. The plastic card is then CA glued to the cardboard below, supported by the old man.

As I wanted the base to be no more than 30cm in width, I am happy the model turned out the way it does. The canopy was modified so that the aircraft can e air transported more easily, The frame is also very easy to pack. I am quite happy.The canopy sits well.What would be great is to be able to plug and pull the canopy at a snap like Lego for overseas travelling for comeption. 

After some cleaning, its time for Vallejo Chrome to be dotted on to form chips from use,

Monday, July 4, 2016

Kittyhawk 1/32 F86K Saberdog Part Two

After two weeks of long struggling to get the fit up and filling up the gaps and sanding and refilling and re-sanding. Things came up to a head and I have a reckoning up my sleeve. I have return those details that I sanded away! Oh, what a sobering thought that was.

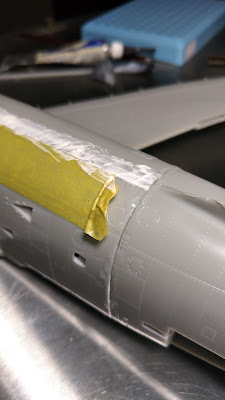
 Protecting the details as much as I can with the sanding. I used Vallejo putty to reduce the damage and basically its just Felspa dispersed in acrylic binders. So, it can be sanded down by rubbing it with Ethanol! Heh...heh.

After about a week. I am done with the sanding. I glued on the canopy. But the main canopy needed me to cut out a slot in the bulkhead in order to have it opened in the postion that I wanted. There is no provision in the kit on how it is attached. Looked like the guys only wanted it closed but with a stud at the end which they forgotten to engineer the cavity to that stut that that they provided. Nothing cannot be fixed. so, I softened the bulkhead painted with liquid cement and after about 10 mins, I used my OLFA knife and cut a slot where it can sit properly inside. The test fit looks good to me.

Next, I prepared the model for reverse masking to have panel differentiation in tonal quality to it. I elected to paint these panels in white and black.

On went the paint. However, I hated the LED colours of the spray booth, its more blue than white. I had to remove them, even though I paid for them, then use a floor standing lamp to make the colour tones more closer to life. I do like the suction though. Its practically useless with the filter on, So, I removed all 3 layers of filter to have it such the air directly and put the duct outside of the window so that the fumes will be vented away.

The masking removed showing patches in black and white. Then I sprayed on 2 tones of greys to get to cover the areas where the RLMs are supposed to cover.

Then I started highlighting the highlighted area with selective positioning of super highlights, to give the greys a liitle more differentiation given that this model is blessed with hundreds of thousands of rivets. I wanted a background where the rivets has got the chance to shine.

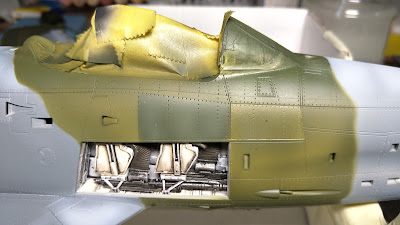
The areas to be covered in RLM Green is arranged with blue tack and Tamiya tape covers the rest of the grays. However, there is one snag, the instruction all have different greens. The box art shows green, the box side shows grey, the instruction painting guide shows brown....what the heck...so, I went to the internet and search and found some old Sabredogs sitting out in the fields and the greens were faded somewhat. So I decided to use green but to tone it in 3 tones to show signs of maintenance. 

The greens when on fine with some minor highlighting done with a more yellowing tone.

The leading edges where painted with a lighter tone of grey in order to stand out after we put on the extensions. I wanted it to stand out so that it can show some kind of difference in colour so that the model becomes a little more interesting to look at.

The cockpit walls were differentiated. It shows how the reverse masking has worked where black panels showed up very differently from bare plastic and white panels. So, with the same green, we get 3 colour tones at one go. I also highlighted some of the darker panels with a touch of white.

The same can be observed in at the rest of the plane. I also masked and sprayed on selectively 5% smoke to create panel differentiation even further.

After the smoke goes on in 3 hours of spraying and masking repetitively, the result is thus. Colour modulation, so to speak

One can see clearly that the Sabre is made of different pieces of metal sheets from the modulation using Smoke. As its so thin, some shades in the corners required up to 3 coats. I also made the vertical surfaces darker than the horizontal to give it a more lighted 3D effect.

The end result is quite pleasing and I started to blast the whole model in Gaia gloss and melted down the paint to blend them tones and unify the surfaces using paint retardant and Gunze Thinners.


The tail section was sprayed with Vallejo Burnt Jet Exhaust, then rubbed over with steel, blue and pink AK Enamel Oils. Then its unified by polishing it. Finally protected with a layer of Gaia Gloss.

Next went on the decals and 100 plus stencils. Some chore that I hated.

The decals were melted into the surfaces using paint retarded thinner. The model is coated with 2 layers of Gaia Matt diluted 90% to protect the decals from bruising and Tamiya black line accentuator is used.

The metallic areas were given brown and black washes.

The great clean up. The first round of weathering is not about weathering the plane, its just for bringing out the details that is so rich on the kit surfaces, otherwise it would have been a great waste.

The superb details painted over with Tamiya black panel lines. This is left to dry overnight in order to do my wet removal method that mimics rain marks.

Wet process round one, It provides for grime gathering in the horizontal lines and some streaks.


The model after clean up, looks quite pleasing and the tonal richness is starting to show. Next, I have to weather the bottom and put in the under carriage. In the meantime, I hope you enjoyed this update and have fun making progress with your models.Chow till next update.