Tuesday, April 21, 2015

Trumpeter 1/32 P51B RAF Part Two

After all that sanding and filling, it has to be down to the time of reckoning, putting back the lost details!

The areas that chips do occur are painted silver. I found that in comparing various types silvers out there, the most robust one seemed to me to be GAIA.

After the silver, protection as robust as it is over coated over the silver, another Gaia EX03 Gloss varnish. Then two layers of AK Chipping is don over the surfaces, which turned out to be a disaster that I will elaborate later.

The medium grey areas of the paint were don with Mr. Colour 36 and highlighted with the new RAF colours from Tamiya, the XF80 with some GAIA gloss added to increase the flow and Mr. Colour leveling thinner is used to prevent dusting build up in perpendicular surfaces.

Disaster struck, with the Tamiya tape one, to try to doe the invasion stripes, the paint came right off the surface even after 48 hours of curing time. Such thing do not occur when I use normal Revlon hairspray or Mr. Colour Silicone Barrier. So, I have to redo the paintwork a few times over again to get it back in shape.
The RAF Roundels are painted and masked again to centre the red circle. Red is sprayed over in thin coats till we get a sheen with some varitones.

The sequence of colours are, blue, red, followed by red.

There is some spillage on some edges, not something we cannot solve.

The roundels are masked again so that we can reverse the spillage by coating the ares with the base coat colour.

Now the bottom roundels are finally done, the rest of the plane is masked to get the invasions stripes in on the bottom surfaces.

Whites are used to spray on the areas that has been prepainted with Mr. Colour 35. Taking care not to get onto the rivet and panel lines so that we have somewhat a preshading effect on the colours.

The Black goes on and later highlights in Mr. Colour 36 Grey.


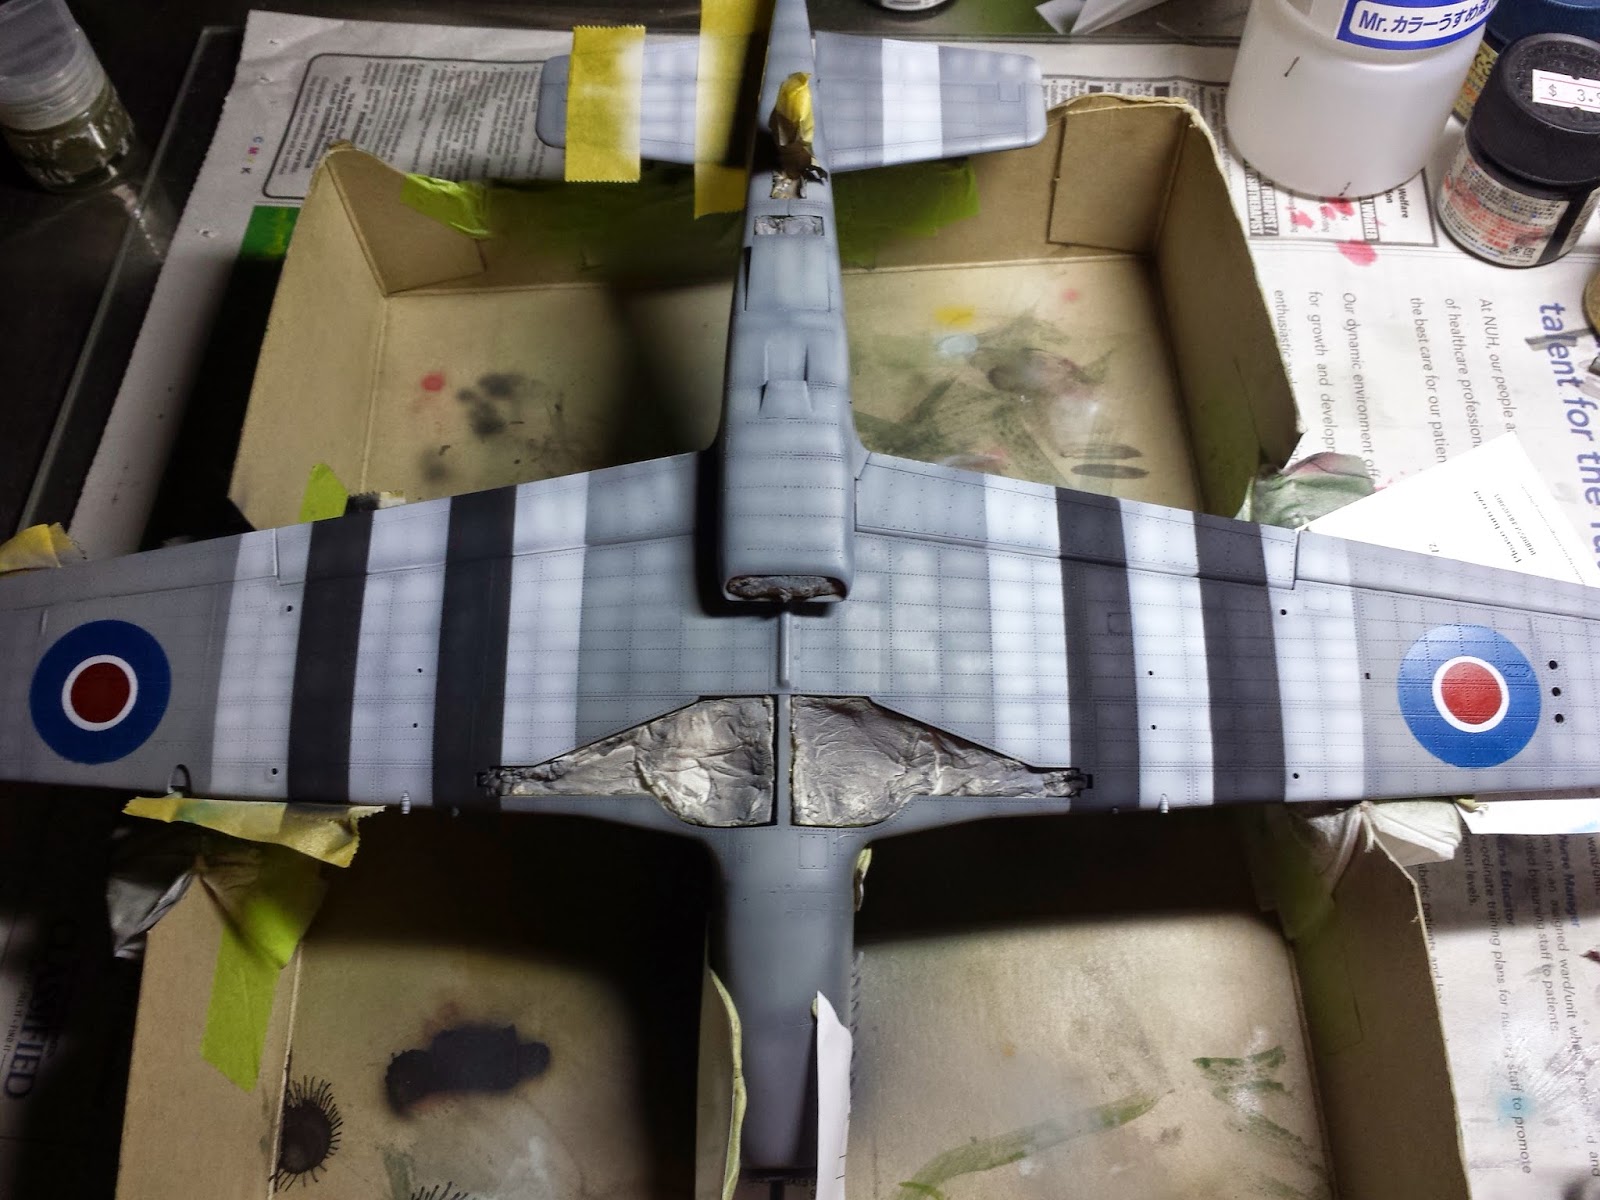
Bottom finally done. Now the masks of the greys has to be removed from the top surfaces so that new masks for greens can be placed on appropriately.

What happened was nothing less than a disaster, even after 5 days of drying time! Meaning, this AK product is relegated to my WW2 Winter tanks only! No more use of it for aircraft.

Masking my greens. Blue tack is used and larger areas and invasion stripes edges are masked with Tamiya tape.


The wing surfaces of the ammunition area, gun access and side of fuselage were totally stripped of paint by the masking tape! 2 days of work down the drain! It has to be remasked and repainted.

Finally, after much struggle from 8pm to 6am on Friday night till saturday morning, I got the invasion stripes on at long last.


 The decals went on after I have a slight coat of Gaia gloss over the whole model. I do not like total gloss as it makes the decals not as homogeneous as the rest of the paintwork. Some guys leveled the whole plane gloss, then gloss over the decals before matting them back again for weathering. Thereafter, all the details will be so shallow that you can only get panel lines and all the nice rivets are gone.

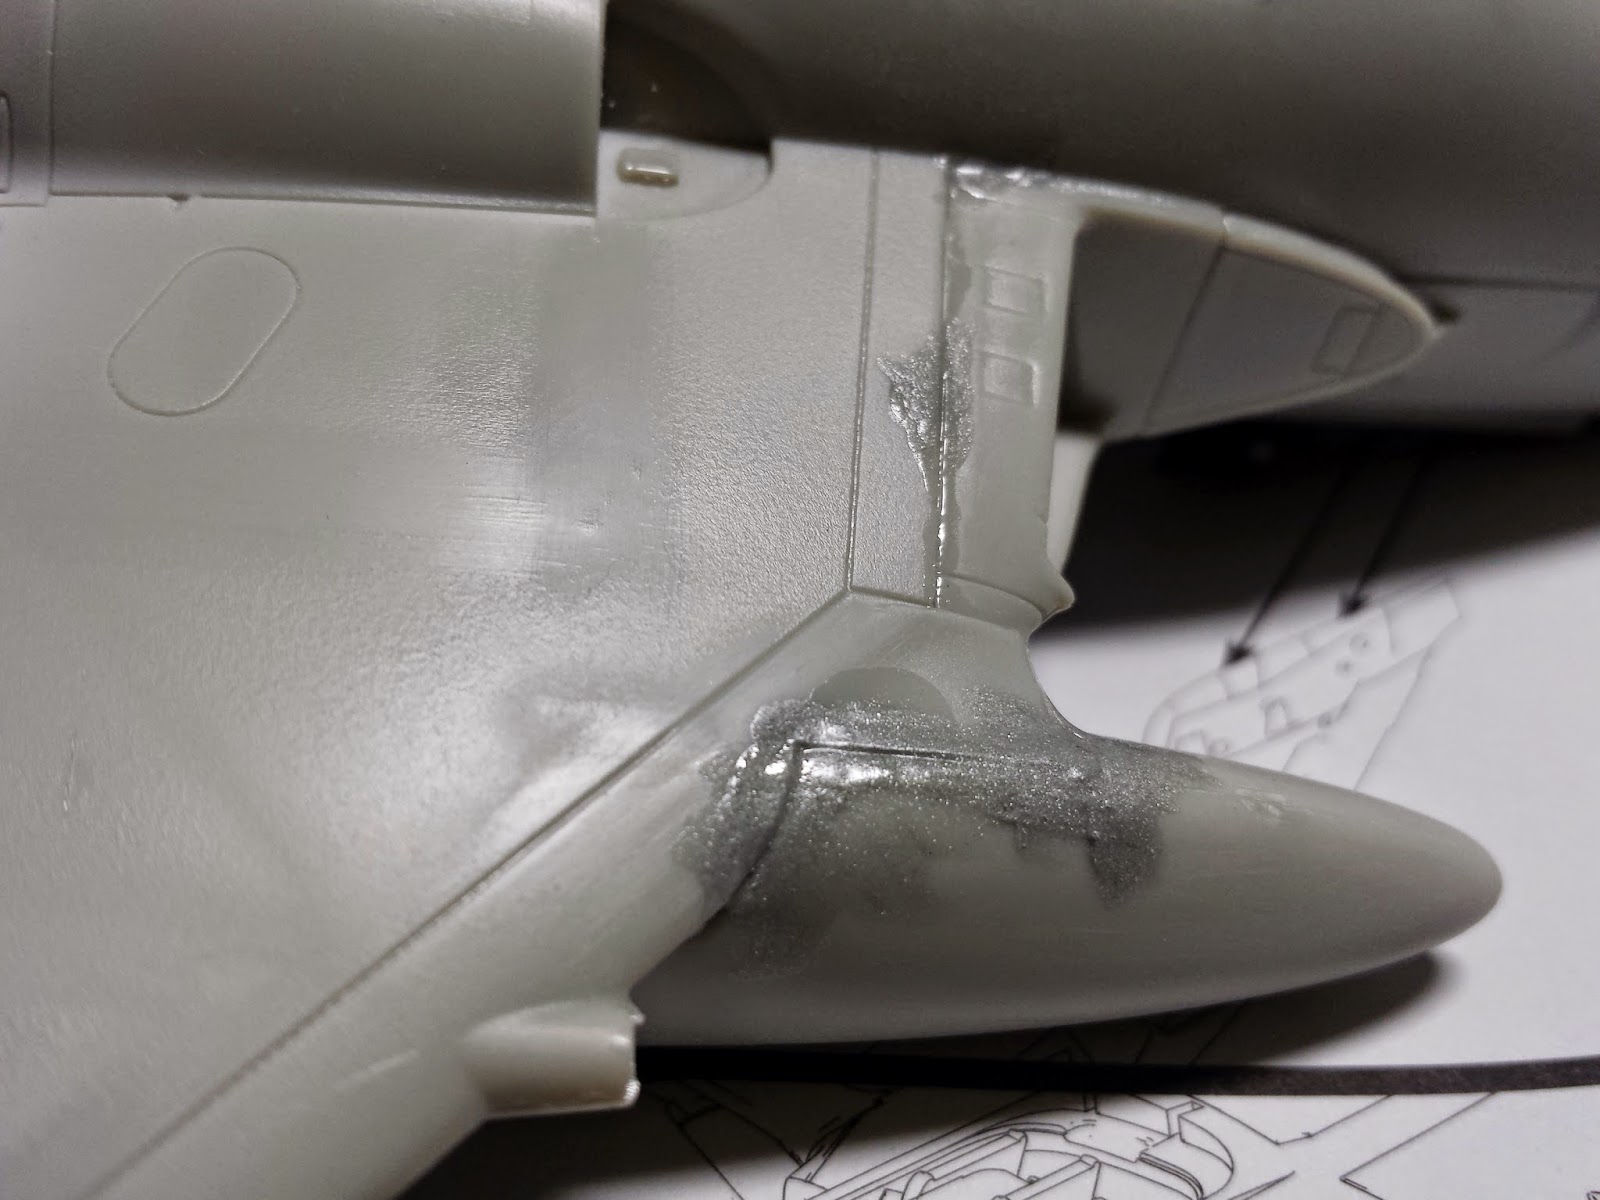
Tail fin anchor point was done with 36 gauge brass wire coiled round a 0.3mm drill bit. This is buried in place using CA Glue.

 The front anchor point is the boom mast. I drilled this across with a 0.3mm drill.

 The imperfections of the bottom of the mask is filled up with paint and left to dry. So is the hole that has been drilled, its been cleaned up and painted over.

The rest of the wing decals and fuselage decals were added, almost 100 of them on the upper surfaces!

The upper surfaces are washed with Tamiya Panel Line Accentuators in black and grey. This is later stripped mainly by Tamiya Enamel Thinners.

Cleaning in progress, using a no. 4 Ashley brush and Tamiya enamel thinner in a broom sweeping mode to brush the washed mainly to the lines and details while taking our most of it using a paper surface.

Chips AHOY, as the paint has become really hard, like what I wished it to be in the first place. I have to put a wet cotton wool on areas I want to attack, about 6 hours of waiting will do. The paint is then chipped by using tweezers.


Thursday, April 9, 2015

RAF Invasion Stripes Trumpeter 1/32 P51B Mustang III

Was advised to use my painting preference to compete for the 1st time in Airfix. MH's Lee told me that a nicely weathered Mustang will be nice for the show.

To get a differentiated look, I decided to open only one side of the gun bays even though I painted both sides already.

Gun bay opens partially as the magazine area has a belt that is too shot. It supposed to be 9 yards long, where the saying originated, the whole nine yards. It looked funny, so I closed the mag area.

The floor board area was masked and painted black and stripped with brown, white, grey and yellowish tan to get the wood grain look.


Finally the cockpit Eduard kit has arrived. I also painted and did up the engine and weathered it. But I have decided to close that part as I have concerns on the kit fitting problems which is not uncommon amongst earlier Trumpeter kits.

Side Wall details painted and ready for marriage.

The sacrificed engine in preference for a good fitting end result.

Gaia black surfacer painted and Ethanol ribbed to highlight the rivets.

Dark grey is used on the whole aircraft to serve as primer inspector for errors and imperfections. Highlights are done in non affected area to check on colour harmony hues.

Wing root and forward fuselage is quite a paint, that even the panel lines did not lined up properly to match and needed to be puttied, sanded down, re-scribed and the screws repunched with 0.4mm diameter hollow point rivet stomper from Hasegawa.


Air intake for the radiator has uneven fit about 0.2mm disparity. This step has to be built up with putty and sanded smooth with details to be re-scribed back later. Tamiya tape is used to protect details.

 Wing root and canopy fit problems, famous Trumpeter trait. The fuselage profile is higher than the wing profiles and needed to be sanded down close to 0.5mm!


Sea Vixen 1/48 Airfix Part One

Wanted to do something different. Came across this new kit from Airfix at Morgan Hobbycraft Centre, a place in Katong Shopping centre that I have been going since 1978. Kit box was slightly damaged as it was highly stacked. But the kit looks good.

I opted to do something different. Some killer colour scheme. Nothing that I have seen before. Ref white and with yellow and black posterior looks very inviting.

The cockpit from the kit is a shame. I looked through ebay for a UK supplier and found several for the Eduard Upgrade set. I use UK like MJW, Stevenmods over Australia and USA because its very speedy. They normally arrive within a week, Australia, even though is 4 times closer takes about 3 weeks from day of dispatch, Should be the efficiency of Royal Mail. Kudos. Same with the USA due to distance and sheer volumes.
The upgrade details are quite nice and glued in place. The dreaded handles are put in too, 50% of them I threw away as it will not be seen anyway. I painted the RIO scope with black and yellow washed it several times before locking the GLOWING binocular scope in Mr. Colour Gloss. I really liked this technique that I discovered and developed while building the 32nd scale F14B Tomcat, which was snapped up on the first day of MCON 2015, which won nothing. It was sold for a ransom that is about 5 times that would have been the offer for the champion single coloured crap Greyhound.

The floor board is weathered and dirt pigments was put and locked in place with diluted matte varnish.


The cockpit is then assembled with Resin seats from Australia after it arrived 3 weeks later. This tub is then protected with wet tissue stuffing masking system that I developed and explained some time early.


The fit is wanting in many parts of this kit, unlike the sublimal Javelin. Seems the indian subcontractors aren't holding up the torch very much in terms of plastic mold engineering comparing to their counterparts in Korea and China.

As I have chosen a much harder scheme to paint, I have decided to close the air brakes, Besides, its not common practice to leave this one while parked somewhere anyway. The fit as common to kits that are designed with opened configurations, closed with gaps a galore full.

Nothing that cannot be fixed by melting and spreading plastic. Once its dry, a good old rub down is the order of the day and the trusty MADE IN CHINA scriber is the ultimate useful tool. For all those in Singapore, I urge you guys to head down to Miniature Hobbies to get one. Better than the Jap reccommended Olfa reverse blades and way way stronger than pins on vices.

Tails all in and now the sanding begin with earnest while waiting for the decals to arrive from Hannants UK. I order 2 decal sheets and 2 grams worth of pitot tubes, They charged me 9.25 quids for shipping and it came in a box that cannot be fitted into the mail box which can hole A3 size by 6" articles! Opening it, I found that it is stuffed with 6 air filled PE pillows for cushioning 3 sheets of paper! They could have sent like everyone else on hard backed envelope that will take only 5 days to arrive and costs only 2 quids. Crapping shipping practices which means the end of Hannants for me and all my gang!

The wingtips did not fit so well, so the good old thin Tamiya cement with 30% putty to the rescue. Sanding it later with wet sandpaper and fibre glass pencil can being up the shine. And the trusty scriber comes in for its bit of action too.

Wings are painted yellowish orange over the preshaded black and then highlighted with lemon yellow.

The wings are polished using my old cotton Tee Shirt to give it a shiny surface so that decals can stick better later.

Both wings completed and polished as described above.

Tamiya Tape all over. This is very tricky as there are antennae and curvatures. The fuel tank station is tricky as it has be painted red later. And red does not stand out on black undercoats. So, it has to be masked. To makes things worst, the black diagonal stripes ran across the two pylons! Lots of edge rubbing is needed to get the tapes to adhere to the edges and nooks. I used a bamboo toothpick to do this as it will not break like normal wooden ones.


The black sections are highlighted with dark and medium grey to give it a homogeneous look like hte highlighted and faded yellow. When the tapes are removed....I am very happy with what came out.


Wing is rubbed and polished to prep it for decalling. I am not a proponent of the usual Future Klear method as it will make the eventual paint too thick and makes weathering the lines difficult.

Decals on for the tanks. Ready for the new Tamiya Matte Varnish. I saw its really very effective.
With the wing tips done, attention is now focused on the main body. The cockpit were masked, puttied and sanded. Tamiya tape with Masking Sol diluted with water does its job all the time.

The painted lower surfaces and the pylons were masked for the white that will be due to come on. Also bearing in mind the red tips as well.

The whites are mixed on several panels with grey to get a mixture of disparity of tonal hues on the turtle back.

With Wheelwells stuffed with wet tissue, on when the two tone yellows.

The base coat orange and the yellow highlights are done with these. The XF3 needed 25% Gunze Gloss and diluted 50% with leveling thinner.

The great revelation. Some edges are not even, so its remasked and touched up with black and grey tones.


Wing tips doe with decal on. Its a double decal on decal design to save on costs of production by Airfix. Tricky to get it all aligned properly. Lots of Microscale Micro Set does the trick followed by the use of Gunze Marksofter.

Tail up with red and highlighted with very thin whitish hues for fading.
Really happy with what turned out. The pylons done and rubbing compoind fine from Tamiya gives me a good glossy sheen ready for decalling. The pylons are hand painted with 3 light coats of Vallejo red by using the glazing method to give it a smooth and even finish.

Tail fins weathered and faded.

Red line painted and decal roundel up and on. The turtle back has loads of cross hatched warning decals. Very tricky as the decals are very thin and spread over antennae and holes. These required cutting and nudging with cotton buds.