I had always had this kit sitting on the shelf for the longest time. I finally took it out and started to make it. After say about 7 years. The decals were shot to bits already.
I decided from the get go to do it with rivets. So I searched for few days online till I muster enough resources to start the process. I used Tamiya masking tape as a guide and worked myself through most of the rivets. To tell you I am 100% there is to tell you a lie. There are some that are left out either by design or by mistake. I started with the tail as the bodywork still required some work.
Some patchwork is required on the fuselage halves, Nothing major, as this is Tamiya after all, not KittyHawk.
The wings did joined nicely to the bodywork and I took care not to press too hard and deform the plastics.
The overhead view of the body work almost done.
I did not forget the tail sections, even though the work is limited however, it does give me a guide as to painting and shading, making it an exciting project to behold.
For the spine antenna mask, I wanted to do something robust, Using the original part as a guide, I cut a piece of thin brass, I drilled a 0.5mm hole for the dipole anchor and clasped it in between two 0.3 polystyrene cards from Tamiya, leaving a long overhang of 4mm as an anchor. The hole is located over the bright light and drilled through with the 0.5mm bit. The mast boom was then sanded to form the aerodynamic shape of the original. I drilled 3 holes of 0.3mm next to each other and cut through with the craft knife to form the anchor slot. The brass end was slotted in and glued in place using CA glue and the top was given a few brush strokes of Tamiya Extra Thin to melt the plastics together.
As usual, I have the canopies masked and glued in place before starting my puttying.
The dark panels shades are given a coat of black. and parts of it were given white so as to provide a variable surface on the finished model.
The bottom was given the blue that I mixed up by eye, to a little brighter than the original as we are found of bruising it quite a bit later.
The top was a case of white and black shading. Thin strokes and large surfaces are coated. Highlights are especially important to parts that reflects the most light.
The bottom was masked off and got the model ready for the camouflage spraying on top.
The top side was treated with my own concoction of desert base coat. I do not use the actual colours as once we started to work oils on them, the colours are shot. I wanted a base to work on and after all the hues and shades we modulated on the surface and then glazed them to unify them, I would like the final plethora of colours in unison to look somewhat like the original hue and tone albeit with complex shades.
The yellow was masked off with tape and blue tack and the base colour of what will eventually be Khaki Drab or Tan is piled on using very thin coat so that we can see the original intention of the black and white patches and lines. Here we find the shades showing through the paint.
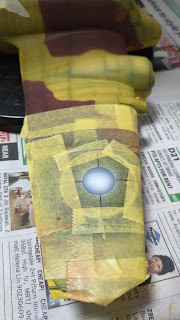
The roundels were a masked affair. So that its robust enough to stand up to the abuse of weathering. From left, Wide Tamiya tape is cut with a circular cutter with cross running through the middle to make sure that the circles later line up. Blue was used again, of my own conconction and then highlighted. Next is critical, the second ring was added but care must be taken to align the cross previous drawn properly so that it will be dead centre. Picture on the right show that I reinforced the masking around the edges of the roundel with extra tape to prevent leakage. The centre was coated with a flared intensity with white. This will later give the red hues with variable intensity so that it gives depth to the colour.
The reds done, two colours of red were used and once dried, the tapes were removed to reveal the roundel. Now the plane is ready for shading. I coated the model with Future and did the decals on the sides.
Masking is used to do colour modulation to the yellows and later to the browns. On the right, Raw umber oils were used to blend the colours together.
From the left, the modulated colours were marked over with raw umber, Once these are blended it displays uneven tones much to my liking as depicted in the middle picture. As the oils will dry lighter, I allowed 1.5 days for it to dry before having a look at the final hues. It appeared much lighter like the picture on the right. I decided to water down the Raw Umber and use it as a glaze in order to control the contrasts further.
After 3 coats of raw umber glazes, the contrast is somewhat muted. Two more glazes were later given to make it a little bit more unified with the rest, and the final overall hue looked like the original colour code given and I was very much pleased with it.
The overall balance of the colours were quite pleasing. Now that the browns are done, I then started to work on the yellows to bring the tones to the sand levels. And also to tone down on the highlights to create a muted contrast like I have done with the browns. Till we meet again next week with part 2, happy model making. Enjoy,


