
Surprise was in store for me when all that masking tapes and masking sol is removed. Smoke out from within! Its not something that can be corrected. After all the puttying and sanding.....painting and now this. The spots and oversprays are easily removed by using Tamiya rubbing compound or toothpaste with a cotton bud. But fog from within for some reason unforseen in my 42 years of making this stuff! Buffling! Enough of rumbling. How to fix this is the crux.

While thinking of how to solve the problem, I carried on doing the rest of the job first. Refining the chips and putting in the undercarriage etc.

I put on the fuel tanks, drilling in the piping and weathering the undercarriage the mud splashes etc.

Doing the wheels and weather the tires and doors. Mud and sand as the planes were operated from open fields.

Putting them together is tricky as its plastic with no metal reinforcement and no real estate for drilling and putting in rods of brass in the wings.

Spraying yellow, then masking them and put in the black and grey, Streaks of grime and chips made from Vallejo Air Chrome Silver.

And chips are added onto the tip of the prop cap. Smoke stacks are painted and Tamiya Buff is sprayed on, followed by Hull Red and then small amounts of black that is extremely highly diluted.

I rummage through my stash of more than 400 kits in the store room and cupboards, I chanced upon this British Tank crew that seem ok to convert with some minor sculpting, it should play the part of a window cleaner.

For starteds, I need to change some surface details and change the right foot pivot angle to suit the plane's wing angle on the ground. I cut it till breaking point and plug in a sprue number tag. Melt the whole lump in Butyl Acetate. After 20 mins, the plastic is soft but firm enough to work like Milliput.

Then the left leg needed an lower angle of bend at the knee. I cut it with Tamiya sprue cutter 3/4 way and waging in another sprue number tag, Again we use Butyl Acetate to melt the whole zone for reworking.

The centre of gravity looks odd, so, the legs need to open up to over shoulder width length. The torso also needed to be more upright. So, cutting along the glue seams, wages in fine tuned with 0.3mm Evergreens. The left but has to be cut to not make it appear like a prosthetic limb! Again melt with Butyl Acetate.


Whack it with epoxy putty to fill up the holes, then use the extras into making a wrinkle rag. Then the plastic flashes and mold marks and superfluous details that was on the tank crew. Arms came from another figure. Test fitted on the wing and looks ok.

What is missing is the head. Looking through my store of Hornet's heads and gotten one that I liked.

I chose one with the SHAG ME MAN! look.

It was sprayed with GAIA Black primer for the acrylics to come.

White applied and now all things go from here on painting the head.

Two days later, wow....very happy about my choice. Looks great!

Try fitting looks good too for me.

Next, I added in the soap suds from a top secret formula....heh....heh. Then I painted in gloss drip lines of Vallejo Gloss Varnish.
Then a brain wave hit me. I ran down to the local store to purchase a pilot from Life Miniatures. This will give me a good scene on the foreground for a tribute to the pilot who led his squadron against the Luftwaffe while still spotting a fever.. His last sortie for a young 27 year old Squadron Leader. Brave soul born in Kiev and grew up in Poland!

The resin kit was washed in hot hand soap to remove the mold wax. Sprayed black GAIA Primer and top sprayed with Tamiya XF1 White.

After painting the eyes using White, Prussian Blue and Sky Blue. The top lashes received a line in black and bottom lid some wash of Vermillion. The Flesh are painted with shadows in red brown and burnt violet.

Some highlighting using natural flesh and Pink Rose.
Then while wet, we spot in some red brown and a 50:50 mix with Pink Rose. Wet on wet glazing method.

The face received some matte varnish to even out light distribution.

The shades of shadows are glaze over with Vermillion mixed with satin varnish and glazing agent.

Pink Rose mixed with light flesh to blend the edges of the shadows and the top sides. Light flesh mixed with white is used for etching out the wrinkles and top side spots to form sheens from facial oils. Work also started with the head dress and gas mask.

Touching up the pupils with black edges and iris

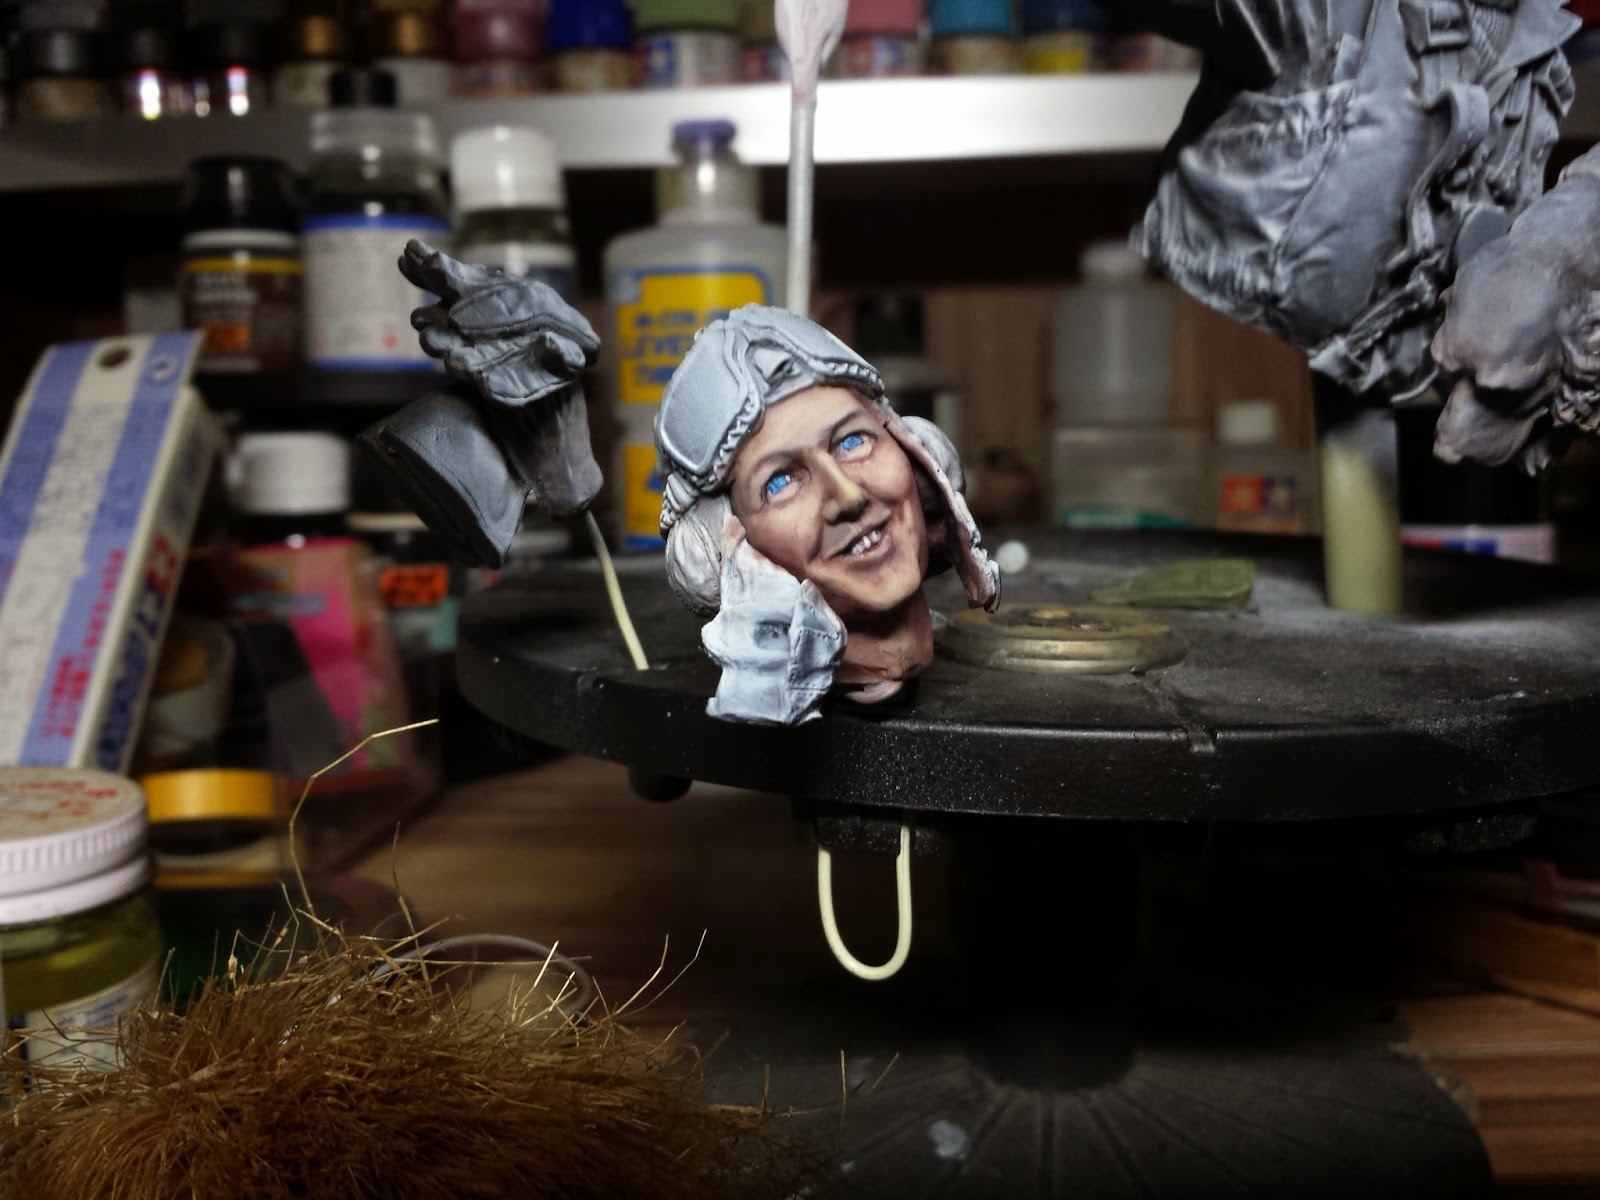
Happy on how it turned out. There was a spot of white on the left check, I was worried and when I took a closer look with my 2.0 glasses, its just a speck of chipped putty, Brushed off easily with my No.4 brush. What a fright.

Work on the head dress is a hit or miss, after 2 days of struggling I am quite happy with how it turned out. I am sure with some brown washes and black to soften the edges, I will be home!

Putting in the details takes some time, there were zippers and buckles,
Till we meet next time HAPPY MODELLING BRETHREN!