Monday, March 24, 2014

1/32 Corsair Part Two

A week has lapsed and much work is done. painting and assembly of the engine. I decided to omit the wires as they are not visible when the cowling is covered. However, the engine itself with close to 100 parts is a challenge on its own.

Before that I made the tail sections, the ailerons, the flaps and the rudder movement assembly. Which I painted with Hull Red mixed with Rose Pink.This is one insitu on the trees and weathered by light tone drybrushing in 2 highlights and Tamiya Panel Line Brown Washes.


The the pink sections are assembled and touched up to the cut areas into the tail sections.


Silver chips are added last to increase the interest in the paintwork.

After the marriage of the engine to the fuselage, I notice the top and bottom cowling covers, which are meant to be detachable, are slightly too small for the engine, leaving a 0.5mm gap of both sides. Its not a big deal, as I filled up with Vallejo grey paint over 2 days by dabbing on some and wiping off the excess. Repeat after 12 hours for 4 times.

Engine is weathered and chipped with Silver paint on grey. Washed in black and brown washes. The whole engine is highlighted to give extra contrast as it will be in a dark shadowed part of the model.

Marriage of engine to fuselage. A bit tricky as the fit is quite difficult.


The top of the halves did not flush well on top and needed some work. I used putty in the form of Vallejo Grey over 2 days and 4 sessions to flush out the line gaps.


Here you can see the gaps being filled up. Next is more filing and sending using very light pressure and 400 grit, followed by smooth emery sticks from the neighbourhood girlie shops. The pink, white and grey type.

Finally, I am working on the wings. Its a challenge as it has 2 main options for up and down, so, I made some errors and needed to tear the wings apart and repair them and put them back together. This is time when I wished I lived in Japan where I can order from Tamiya spare trees B, C and M for to make new wings and junk the ones that went bad. Afte struggling till 4 am for 2 nights, I managed to scrape through without feeling that the parts are a let down. There are about 10 diagrams in the centimeter thick instructions that were confusing. With the small photoetched parts being the brunt of the difficulties. Finally, I must say, its all behind me right now without much problems left.

Tuesday, March 18, 2014

Tamiya 1/32 F4U Corsair Birdcage Part One

Well, I was working on the Hasegawa Stuka but Luckymodel's seat belts from Eduard was delayed, so, I have to put that project aside and work on the Tamiya 1/32 scale Corsair.

This is a breathtaking build as the parts in the cockpit alone was 16 stages covering 5 pages! Painting it and using the Eduard Zoom kit was no mean feat. The dials needed me to file down the transparent part which was very thick, and then paste one layer on another, which I felt was not very good, so I added CA into the layers and then correct the blur with Johnson Klear on the dials.


Then the bulkhead and the side consoles were weathered. The green is Gunze, a mix of my own from the Israeli Green with some Catapillar yellow and a dash of white to warm it up. These are further washed with Tamiya enamel black and brown washes to warm the colour further and take in the shadows.
The raise areas are highlighted with Vallejo Olive Green with 50% white added to increase the contrast of the raised details. The photo etched panels are a little too shiny, so I drybrushed the panel with some neutral grey with some blue added to it. Then toned down with matte varnish.

Document carrier is painted hull red and drybrushed with buff. I washed it with Tamiya Panel Black and set it vertical for gravity to enhance the look of shadows. Seen here is before the wash. The dials were filled up with Klear. Note the highlighted details even though most of it will be very faint.

A view of the front fire wall with side panels attached. The wheels and bobs were chipped with aluminum and then later I painted the bob heads red according to the instructions. The Eduard detailed throttle system was junked and I kept the kit's offering but added the decal from the Eduard set to increase contrasts and details in the side walls to make it a little more interesting.

Another view of the cockpit firewall.

The rear bulkhead was painted insitu on the tree to ease handling and the cut off parts of the sprue is then touched up when ready for assembly. The seat belts on the photoetch of Tamiya looked like 308 stainless steel and it behaves like one. It does not respond to glue well and parts of the nylon release straps, depicted as a T shaped part number 6 were junked, I prefer to use paper dipped in Super Glue instead for better manageability. Bending the belts to conform to the seat was a nightmare. Painting it and shading it as well is too since nothing sticks well to 308 stainless steel. I wished Tamiya will junk this and go back to copper or steel. To prevent corrosion associated with the 2, Tamiya can opt to plate them later. This prevents the nightmare of trying to bend them to shape to look natural.


Finally, the backward part is married to the cockpit assembly, this alone took about 80 man hours of work as the whole area is hand painted. No airbrush is used as I wanted the wear and tear look. Chips on the bucket were also added before I added the belts.

The cockput completed at long last. Next is to bring this thing into the body halves without the headaches for painting later. There are parts of the canopy that needed to be added and masked into the cockpit before the marriage of the halves, this poses a serious challenge. Nothing bazzare though.

Final Look of the cockpit.

Monday, March 3, 2014

Kawanishi N1K1 Part 4

2 weeks of home renovations take a toll on work. Sawdust everywhere took a week just to vacuum.

Then there is a move into the new hobby centre from my table.

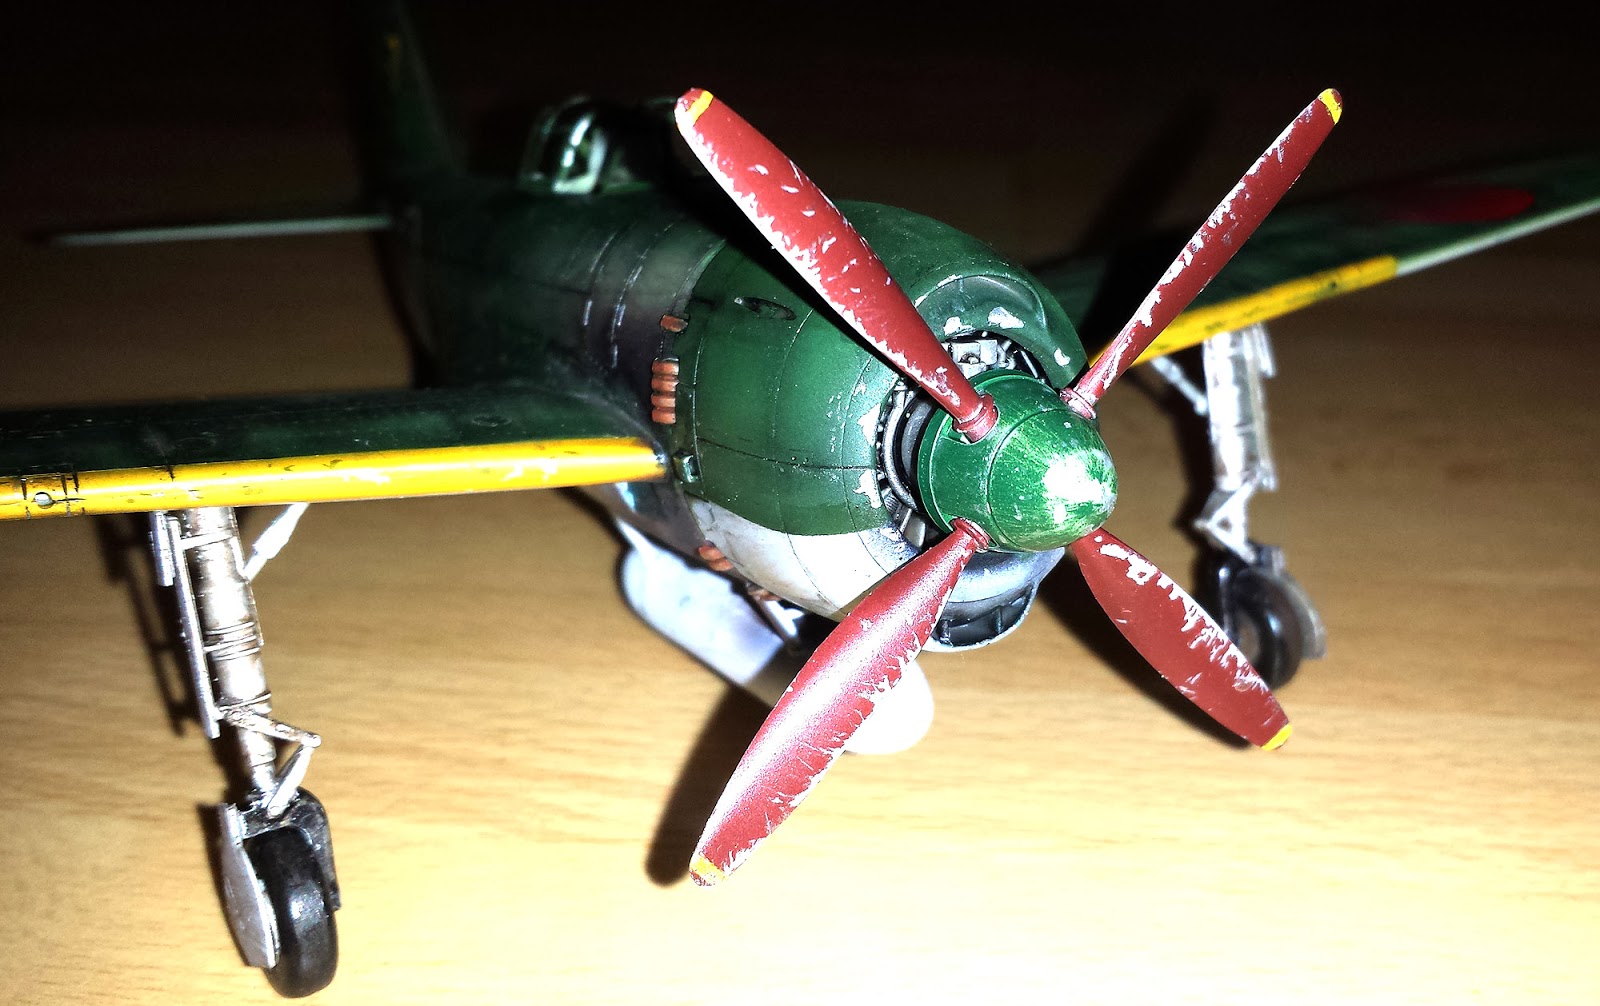
But after 2 days of highlights and rubbing down and chipping, the N1K1 Shiden is almost done. With only the Machine gun ports and dorsal antenna.


Highlights are sprayed onto the top surfaces to replicate some sun baking. Some extra chips are added via using a silver pencil.

The props is in with chips using cut sprue and painting. Nose cone is rubbed with Colgate.

Shading the top surfaces.

The air filters added and the fuel tanks weathered.

Rear rivets after highlights.

Almost there. See you in a few days for the finale/ Then we start work on my 1/32 Hasegawa Stuka G2 Kannonenvogel.

Cheers

Wednesday, February 5, 2014

Kawanishi N1K1 Shiden Part 3

Well, its one more day at the desk before I have to head back to work in the real world tomorrow. Was waiting for someone till 2 am so I did some work on the Shiden.


I did some experiment in hope to invent an new style of painting. I did not post shade this plane, instead, I use Tamiya Panel Accentuator Black to paint on the shadow places. The surface has to be gloss, so I Kleared it before hand. Then I use a brush wet with Tamiya X20 Enamel Thinners as described in Part 2. I sort of repeat it again as I may have missed out some pictures as I was working with my Samsung Galaxy S4 phone cam here and some using my trusty Canon Powershot G5. I have the EOS and L Lenses, frankly, for blogs, there is no need for those stuff.

With sweeping strokes of number 2 brush I modulated the black till we have a gradual tone from the panel lines being the darkest, to the centre of the panel, lightest....its like the SMURGE tool in photoshop. But its a wet method of enamel glazing, so to speak. Taking care to go in the direction of the airflow so that the dirt does not move forward and ahead of the lines but backwards towards the stern. This is very important, unlike AFV models.

Next I added the target reticle from Eduard for the Kyofu, on which this airplane was based on. The part is very small and with my 150 degrees far sighted glasses on full capacity, it was a tough thing to stick on, as its sits on transparent part, its glued in place using Ashley White Glue. The antenae at the rear of the cockpit was also a challenge. The canopy were painted and then chipped with silver and glued in place with a combination of White Glue and Tamiya Extra Thin Cement.

I then enhanced the chips around the wing area as these panels were removed after every flight to service and reload the guns. Also the chips on the ladder steps on the left side rear of the cockpit. I did more chips to the front cowling for Cannon loading hatches as these are opened every flight as well.

The whole plane is now ready for matte finish, diluted matte varnish and thinner medium and water is done to brush on by using number 4 brush. This is done on a almost off loaded and dry brush, so, it skimmed the surface like we would on painting figures. The end result is the reduction of the shine and make the weathering tones a little more gradual.

Happy with the progress so far.

See you in the concluding episode in a few days.

Tuesday, February 4, 2014

Kawanishi N1K1 Part 2

Once the black Tamiya panel lines accentuator is dried over 4 hours, the blending process is about to begin.

However, I decided to do the chips first and the exhausts. The chips were done with a micro watch makers' screwdriver. Then I spray a larger area on the front of the fuselage with desert sand, followed by hull red and then some black in receding quantities.


We must not forget the gun smoke soot and cartridge ejection port dusts before we brushed on the Tamiya Panel Accentuator.

Once the Panel Accentuator is dried over the decals and the surfaces, modulation with Tamiya X20 Enamel Thinner can begin with a Number 2 brush moisten with it.


Part of the wing after modulation, around the decal areas.

Wing area after modulation. The tones should be darker around the panel lines and diminishing around the middle. However, we must not forget the streaking effects of wind and weather during flight.


Second round of accentuator to mark out the fabric ailerons and tail planes. The sides of the fuselage was also given the wash.

Fuselage rivets being accentuated by the process. The Hasegawa stomping tool after the rotary riveter proved to be a great asset. See you next time for the top surfaces.

Monday, February 3, 2014

Kawanishi N1K1 Part One

Gong Xi Fa Cai.

Using the 2 weeks holiday, I went head on for a full swing into catching up on model making.

I had this Tamiya 1/48 scale model for a long time. The first thing that happens, is that I noticed the film of the decals turned brownish yellow. The thing about Tamiya old decals is that its double the thickness of most decals produced and its film is robust.


I packed the decals in a Zip Lock bag and hang it out on the window grille of my kitchen to sun for a week. The UV rays of hot Singapore is gonna bake it bleach clear again.

After 4 days in the sun, the dials can be used and cut out for good measure, to prevent them turning pink anytime soon.

Now back to the subject of choice. Its because its a super fast fighter adapted from the Kyofu that is used to strafe the Brits on the ground in Burma and used to attack Singapore back in 1941. A result that devastated the next to useless Buffalos and some Hurricanes that the RAF had in Kallang Airport. The war resulted in my grandma losing 6 of her children to Japanese atrocities against the Chinese population. Hundred thousand lost their heads and were forced to dig their own graves in Changi and bayoneted. Officers will boasts of their prowess on the katana in competing with each other of the number of heads that they can chop off their hapless civilian prisoners with single blows. They would have them knee in a row, chop off one, kick into the pit and go on to chop the next guy. The other office will stand opposite side of the trench and do the same to his row of prisoners and the guy who gets to the end first wins. Most of these will result in free rapes arranged by the soldiers from women captured during the day!

Well, this is part of our country's history, it does not matter if the Shinzo Abe accept it or not. The Shiden, or purple electricity or lightning (direct translation) has a great part to do with this taking of the Fortress of the East! The sun indeed set on the British Empire then and also with the sinking of the Prince of Wales and Repulse battleships nearby.

First part of the job was to gather enough research materials for this subject. I noticed that there were thousands of rivets on this plane that is not depicted in any kit available except in 32nd scale. However, the 32nd scale one has shameless cockpit details that is reminiscent of ancient Airfix kits that cost 80 cents each back in 1971! Albeit without the rubber bladder of cement.

The discovery of such drawings almost gave me a real challenge. How do I put in the thousands of rivets? There must be some mechanical process. So I headed down to Lee's shop. Miniature Hobby and saw a rotary rivet stomper. Got it for about 19 bucks. And for good measure, I bought a 22 bucks P38 Lightning just to try it out. Better that than the old N1K1 as its kind of rare nowadays.

I used a masking tape to mark the distance of the lines from the previous ones and started rolling them press hard on the plastic using my Hasegawa flexible ruler template set.

The rivets were kind of shallow and painting it will obscure it from view. Therefore, I used o 0.3mm drill bit and gave each of them a 4 turns! One half of the fuselage took about 8 hours of struggle. There had to be a better way. I went down to Hobbypoint and pick up a 0.25mm Hasegawa rivet stomper! This is very costly, 35 bucks. It is a huge improvement, however, the other fuselage also took me 6 hours! What an improvement!!!! Hahahahah......


To help me see during preshading, I need to increase the contrast of the rivets. So I painted the whole aircraft with Vallejo Black, then I rubbed this down with super fine Tamiya sanding sponge with water.

This is quite satifying. Seeing the enhancement it did to a 20 year old kit!

Next I spent 2 days working on the cockpit with Eduard photoetches.

Once this is done and glued in place, Work begins with pre-shading the lines.

The colours I did on the model were all Gunze Sangyo. Russian Green darkened with Black to form a 2 tone green for the tops. Greyish white is used for the bottom. Black is used for preshading on the bottom, while the top is sprayed dark IJN Navy green and highlighted with the darkened Russian Green.

The topside was painted near the wing roots with glossy white followed by Silver Chrome from Gaia paints. Reason for this is to serve as a scratched paint chips as part of weathering. This surface is cured and then painted over with Gunze Silicone Barrier and then the main painting goes over that and is allowed to cure for 24 hours before any masking tape is used.


The ailerons are painted solid darken Russian Green highlights and then the ribs are masked with tap and given a dusting of the dark IJN Navy Green.


The whole model is now coated with Klear and gotten it ready for decals. The wing root areas are chipped with a small screwdriver.


Once this is done and the decals are cured, I started the blackwashes.


Saturday, February 1, 2014

Hasegawa 1/48 F14A Tomcat Completed

Finally, done! The experiment with paint modulations and patchwork.


GONG XI FA CAI 2014 HEEEEE HAAAAAH!!!!!